Bead and Groove Design Considerations in Diaphragms
One of the most popular flange designs in diaphragms is the Beaded Type. This style of flange enables the designer to control the amount of “squeeze” applied to the diaphragm's flange without concern for the amount of force applied to the flange during assembly.
Controlling squeeze avoids the three most common types of premature failures:
- Not enough squeeze resulting in flange leakage
- Over-squeezing the flange and cutting the diaphragm
- Flowing the elastomer into the working area of the diaphragm, causing it to distort and fail prematurely.
Remember, the benefits of a sound bead and groove design can be lost if the bead and the bead groove are not designed as a mating unit.
Understanding the deflection factor is key to success
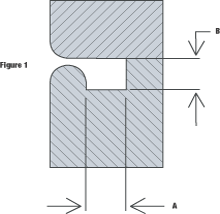
The first consideration is how much to deflect the rubber to effect a seal. This number may change for some compounds but generally we recommend a minimum of 20% deflection of the elastomer (B dim., Fig. 1). This number ensures that the seal will be maintained even after the elastomer takes its compression set. Since the flange thickness and the hardware dimensions need tolerances, the design should be calculated at 25% with an over/under factor of up to 5%. This is usually enough to allow for normal tolerancing of the hardware to ensure a good seal.
Adjust accordingly
There are those situations where the variation in elastomer thickness or hardware dimensioning is such that it is impossible to keep everything in the range to maintain the 20% to 30% deflection. In cases such as these we recommend that the deflection exceeds the 30% recommended maximum rather than go below the 20% recommended minimum.
Rubber does not compress, it flows
It must be remembered when designing a bead and bead groove that the elastomer is incompressible. When you deflect it 25% to form a seal, the elastomer needs a place to go. If you haven't provided that room in the groove area of your hardware, then the elastomer will flow out of the groove into the working area of the diaphragm. This can cause cracking in the flange radius area of the diaphragm or enough distortion in the diaphragm to cause the two sidewalls to come together, resulting in failure. To avoid these problems, simply design your bead groove so that when the hardware is assembled, the volume of the groove is such that it can contain the largest bead the spec. will allow (A dim., Fig.1).
Designing parts that can be manufactured
Another point to consider when designing beads on diaphragms is to make it as “manufacturable” as possible. This will ensure a better product, as well as help provide better price stability. For example, the main problem experienced in the manufacturing of beaded diaphragms is air entrapment. This “trapped air” displaces elastomer in the bead resulting in a reduction of bead volume.
Bead and fabric placement is critical
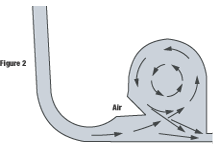
Most of the time, air entrapment is not a problem on standard “D-Bead” parts where the fabric is on the same side of the part as the bead. The reason for this is that the fabric acts as a leak path out of the mold for the air, enabling the elastomer to completely fill the bead area. However, when there is no fabric in the bead, as in a homogeneous part, or one that the bead is designed onto the elastomer side of the diaphragm, there is no way of ensuring that all the air will be forced out of the bead. This is due to the fact that the bead's geometry prevents the elastomer from moving in a straight path (Fig.2), keeping the air in front of it and insuring that the volume and height of your bead remain constant.
Designing parting line to avoid air traps
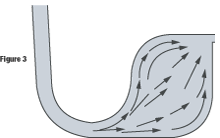
Solving the placement problem is relatively simple. We recommend moving the parting line to the opposite side of the bead (Fig.3). This enables the elastomer to move in a straight path, keeping all the air in front of it and insuring that the volume and height of your bead remain constant. There are no special bead groove requirements for this because there is no increase in volume of elastomer. It is important to remember that you are obtaining the seal by deflecting the bead from top to bottom, not side to side.
For Product Inquiries & Information Only:
